 I really am enjoying Adobe Ideas on my iPad 4. I first started to use it years ago, close to when it was released. Back then I had an iPad 2. I hated it. I thought, what a limited program. So many things it did not have. I wanted full Adobe Illustrator on my iPad. I stopped using it for over six months. I went to visit some in-laws and had some time to give it a second try. I wanted to draw and it was what I had on my iPad at the time. Surprising, I picked up the tools quite quickly. I think it was because I was giving it a proper chance and not expecting the world from it. I now love it. I think it is an amazing tool. The portability of the iPad makes it even better.
The limitations are not even an issue. I might even call them features. One example is the limited number of layers. This makes me commit to a drawing and merge layers as needed to continue to a finished design much faster. It almost forces me to be creative and keep my loose style moving and not fiddling until it is just perfect.
I start with my line drawing and as I work I add layers so I can erase parts without effecting the line work under it. Nothing fancy here. I merge all the line work into one layer that I keep on top of all the colour layers I will be adding. I must comment on the line work with the amazing paint brush tool. The iPad does not have pressure sensitivity like a wacom tablet or wacom cintiqu. I use these with my destop computer and love them as well. Great products. Adobe Ideas mimics the thick and thin line work of a pressure sensitive tablet even thought it does not have this capability on the iPad. Some pens have pressure sensitivity in them and the software communicates with bluetooth to add this function to the iPad. At this point in my Adobe Ideas experience I was amazed that it was creating a fluid brush or pen like thick and thin with only software. Simply put, amazing. I could not put it down and drew all weekend.
Now I wanted to bring the Ideas files into Illustrator to clean them up and see if this would bog me down or add a new tool to my workflow. I have been using Adobe Illustrator for years and it is an amazing drawing program. I did most of my work with the pen tool pushing and manipulating curves and vectors. Now I have a more natural drawing system. I started to discover that within Illustrator the Paint brush tool is similar to the Ideas one. I know this and tried it in the past but never got attached to it. I stuck with the trusted Pen tool.
 When bringing my Ideas files into Illustrator, they come in with many control points that make for a crazy file. With little or no shading and highlights in your Ideas files you will find a lot less of this. You will have less vector shapes for Illustrator to display. I like to use the transparency in Ideas to crate highlights and shadows and this can make for larger files. I am getting better at adding the highlights and shadows with less transparency and less layered shapes. Now when in Illustrator I select all the colours and go to the Object Menu - Path - Simplify. You do not have to modify the sliders that much. The Angle Threshold I usually put to 0%. The Curve Precision I use between 75-100%. I commit and if I think it simplified the art to much I just use undue and try agin. After a while it becomes second nature. When in the Simplify panel you can see the number of control points you are saving and it is amazing how a little change can make such a difference. I usually do this for my black layer separate from my colour layers. The black layer I need more, or different, control of the settings. Then I will take the eraser tool and erase all the colour poking out of the outside edge of the black line work. When zoomed in going around the image I will come across some areas that need some fixing and this is where I use the warp tool (Shift +R) to push my colours back under the line work. With the line work layer locked it is pretty fast to clean up an Ideas file.
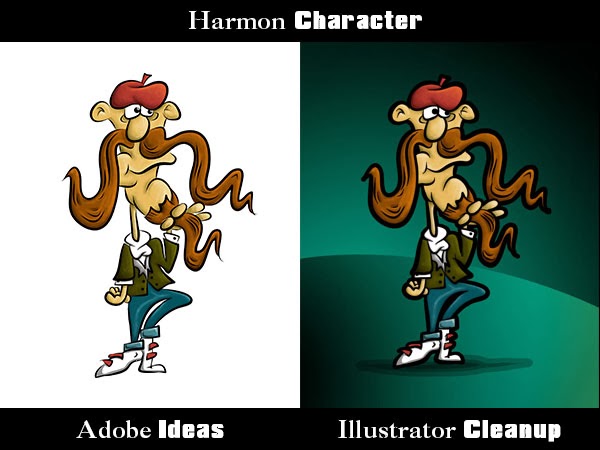
Then I take some time. Have some fun and create a background for my character. Possibly add a drop shadow for the character to stand on. Many times I will group all the layers Ideas has imported and then group them again into one layer. I duplicate this layer, Select all (Keeping the original art layer locked) and use the Pathfinder - Unite to merge the character into one solid shape. Then I will add a thick outline to this shape. That is it, the file is really close to the original Adobe Ideas file. See my examples with original Adobe Ideas files on the left and the finished Illustrator Cleanup files on the right.
Now I still use Adobe Ideas and Adobe Illustrator loving both of them. I would definitely recommend Ideas to anybody who has interest. Over time the Adobe team has added new features include some compatibility with speciality pens for the pressure sensitivity that I spoke of earlier. I have not use them and feel no need for the software does an amazing job of thick and thin on its own. Perhaps it would help with transparency depending on the pressure used. That may be worth a look. The team has many added features since its first release. They keep improving the product. I hope this trend continues. Would I love full Adobe Illustrator on a portable tablet, of course I would, but Adobe Ideas is a great app that complements Illustrator very well.
Hope you enjoyed this look at my love for Adobe Ideas and Illustrator. Let me know your thoughts and what tablet drawing programs you use.
No comments:
Post a Comment